You have successfully created the
index.php
and
style.css
files as the basis theme in the previous article on how to create WordPress theme from scratch part 1.
However, the appearance and functions of the theme are still very simple. Then you need to develop it to have an attractive appearance and customizable features.
To make it happen, you need to create a
functions.php
file,
header
file and
footer
file. For illustration, in this experiment, we are still creating a theme that has the same structure as Xriley’s.
Follow along with the second step of creating a WordPress theme below!
Creating the Functions.php File
First off, you need to create a functions file. This file contains program code designed to accomplish a specific task.
There are two types of functions based on who created them: (1) Built-in Function, and (2) User Defined Function. The first type of function is a default one.
While User Defined Function is a function that we create ourselves. Here, we will practice creating functions with the User Defined Function approach. Here are the steps:
- Create a new file in VS Code or the text editor you are using. Name the file functions.php.

Create functions.php file in VS Code
- Go to folder (C:) > go to xampp folder > select htdocs > select the WordPress folder you created. Here we use the name testingdua > wp.content > theme > WordPress-theme-from-scratch folder.

Create functions.php file in VS code
- Then, click Create File.
If you already created the functions.php file, we will fill it with three types of code, (1) Define version and directory, (2) register theme features, and (3) enable CSS and JS (JavaScript).
1. Define Version and Directory
The use of define is done so that in the future the code becomes tidier and easier when there is a function call. The filling of the define function is for:
-
TUTORIAL_VERSIONcontains the version of the theme -
TUTORIAL_DIRcontains the direct path location of the theme -
TUTORIAL_URLcontains the url location of the theme path
To code in functions.php, copy the following code define version and directory first, and insert it into the functions.php file.
<?php
/**
* Tutorial functions and definitions
*
* @package Tutorial
*/
define( 'TUTORIAL_VERSION', wp_get_theme()->get( 'Version' ) );
define( 'TUTORIAL_DIR', get_template_directory() );
define( 'TUTORIAL_URL', get_template_directory_uri() );
It will look like the one below:

Insert the define version and directory code into functions.php file
Afterward, you can do manual coding on the file.
2. Registering Theme Features
If you have made the code define and directory entries, the next step is to register the theme features. There are 3 features that we activate, they are:
-
dd_theme_support( 'automatic-feed-links' );feature to add rss meta tags -
dd_theme_support( 'title-tag' );feature to add artkiel title meta tag -
dd_theme_support( 'posts-thumbnail' );feature to add article featured image
These 3 features must be enabled in the theme creation, so that the SEO functions can run. To enable it, please copy the following code and insert it into the functions.php file.
/**
* Sets up theme defaults and registers support for various WordPress features.
*/
function tutorial_setup() {
/*
* Make theme available for translation.
* Translations can be filed in the /languages/ directory.
* If you're building a theme based on Tutorial, use a find and replace
* to change 'tutorial' to the name of your theme in all the template files.
*/
load_theme_textdomain( 'tutorial', TUTORIAL_DIR . '/languages' );
// Add default posts and comments RSS feed links to head.
add_theme_support( 'automatic-feed-links' );
/*
* Let WordPress manage the document title.
* By adding theme support, we declare that this theme does not use a
* hard-coded <title> tag in the document head, and expect WordPress to
* provide it for us.
*/
add_theme_support( 'title-tag' );
/*
* Enable support for Post Thumbnails on posts and pages.
*
* @link https://developer.wordpress.org/themes/functionality/ featured-images-post-thumbnails/
*/
add_theme_support( 'post-thumbnails' );
}
add_action( 'after_setup_theme', 'tutorial_setup' );
You can place the code above, below the previous code that you have created. The code positioning is as follows:

Insert theme feature code into functions.php file
You can also add various other types of features to this file. To know about other features, you can check out this link.
3. Activating CSS and JS
In the last function, we will call cs and js into the theme through the functions provided by WordPress. In the code below, we call 2 functions to call js and css, namely:
-
wp_enqueue_style();to call the style for more details can be checked here. -
wp_enqueue_script();to call js for more details, please click here.
Here’s the function call that you can copy and place in the functions.php file, below is the previous code.
/**
* Enqueue scripts and styles.
*/
function tutorial_scripts() {
wp_enqueue_style( 'tutorial-style', get_stylesheet_uri(), array(), TUTORIAL_VERSION );
wp_enqueue_style( 'tutorial-theme-1', TUTORIAL_URL . '/assets/css/theme-1.css', array(), TUTORIAL_VERSION );
wp_enqueue_script( 'fontawesome', TUTORIAL_URL . '/assets/fontawesome/js/all.min.js', array(), '6.1.1', true );
wp_enqueue_script( 'popper', TUTORIAL_URL . '/assets/plugins/popper.min.js', array(), '2.11.5', true );
wp_enqueue_script( 'bootstrap', TUTORIAL_URL . '/assets/plugins/bootstrap/js/bootstrap.min.js', array(), '5.2.0', true );
}
add_action( 'wp_enqueue_scripts', 'tutorial_scripts' );
The code placement is as shown below:

Activate CSS and JS in functions.php file.
4. The Final Result of the Functions.php File
The functions file that you have filled with the 3 types of code above will have the following structure:
<?php
/**
* Tutorial functions and definitions
*
* @package Tutorial
*/
define( 'TUTORIAL_VERSION', wp_get_theme()->get( 'Version' ) );
define( 'TUTORIAL_DIR', get_template_directory() );
define( 'TUTORIAL_URL', get_template_directory_uri() );
/**
* Sets up theme defaults and registers support for various WordPress features.
*/
function tutorial_setup() {
/*
* Make theme available for translation.
* Translations can be filed in the /languages/ directory.
* If you're building a theme based on Tutorial, use a find and replace
* to change 'tutorial' to the name of your theme in all the template files.
*/
load_theme_textdomain( 'tutorial', TUTORIAL_DIR . '/languages' );
// Add default posts and comments RSS feed links to head.
add_theme_support( 'automatic-feed-links' );
/*
* Let WordPress manage the document title.
* By adding theme support, we declare that this theme does not use a
* hard-coded <title> tag in the document head, and expect WordPress to
* provide it for us.
*/
add_theme_support( 'title-tag' );
/*
* Enable support for Post Thumbnails on posts and pages.
*
* @link https://developer.wordpress.org/themes/functionality/ featured-images-post-thumbnails/
*/
add_theme_support( 'post-thumbnails' );
}
add_action( 'after_setup_theme', 'tutorial_setup' );
/**
* Enqueue scripts and styles.
*/
function tutorial_scripts() {
wp_enqueue_style( 'tutorial-style', get_stylesheet_uri(), array(), TUTORIAL_VERSION );
wp_enqueue_style( 'tutorial-theme-1', TUTORIAL_URL . '/assets/css/theme-1.css', array(), TUTORIAL_VERSION );
wp_enqueue_script( 'fontawesome', TUTORIAL_URL . '/assets/fontawesome/js/all.min.js', array(), '6.1.1', true );
wp_enqueue_script( 'popper', TUTORIAL_URL . '/assets/plugins/popper.min.js', array(), '2.11.5', true );
wp_enqueue_script( 'bootstrap', TUTORIAL_URL . '/assets/plugins/bootstrap/js/bootstrap.min.js', array(), '5.2.0', true );
}
add_action( 'wp_enqueue_scripts', 'tutorial_scripts' );
Creating a Header File
The next step is to create a header file, which is a code that organizes the part of the document that is located at the top margin. Without further ado, here are the steps to create a header.php file:
- Create a new file with the name header.php in a text editor.

Create header.php file
- Navigate to the folder (C:) > xampp > htdocs > testingtwo (you may have a different WordPress folder name) > wp-content > themes > WordPress-theme-from-scratch.

Create header.php file
- Then you can click Create File.
- Insert the code* into the header.php file > click Save (Ctrl + S).

Create header.php file
*Here is the code that you can copy-paste into the header.php file, which you have created.
<?php
/**
* The header for our theme
*
* @package Tutorial
*/
?>
<!doctype html>
<html <?php language_attributes(); ?>>
<head>
<meta charset="<?php bloginfo( 'charset' ); ?>">
<meta name="viewport" content="width=device-width, initial-scale=1">
<link rel="profile" href="https://gmpg.org/xfn/11">
<?php wp_head(); ?>
</head>
<body <?php body_class(); ?>>
<?php wp_body_open(); ?>
<header class="header text-center">
<h1 class="blog-name pt-lg-4 mb-0"><a class="no-text-decoration" href="<?php echo esc_url( home_url( '/' ) ); ?>"><?php bloginfo( 'name' ); ?></a></h1>
<nav class="navbar navbar-expand-lg navbar-dark" >
<button class="navbar-toggler" type="button" data-bs-toggle="collapse" data-bs-target="#navigation" aria-controls="navigation" aria-expanded="false" aria-label="Toggle navigation">
<span class="navbar-toggler-icon"></span>
</button>
<div id="navigation" class="collapse navbar-collapse flex-column" >
</div>
</header>
<div class="main-wrapper">
In addition to the html tags that we take from the theme, it should be noted that in the header.php there are functions that are called such as:
-
language_attributes();functions to call the WordPress language used for detailed usage can be checked here. -
wp_head();functions to call meta tag components and css or js files for detailed usage can be checked here. -
body_class();calls the default WordPress class for details on how to use it, see here. -
wp_body_open();serves to call the function in the hook for detailed usage can be checked here. -
bloginfo( 'name' );serves to call the title of the website for detailed usage can be checked here.
Creating a Footer File
The final step is to create a footer file, which is the content area at the bottom of WordPess. It contains the
wp_footer();
function. The code serves to call footer components such as CSS and JavaScript calls.
Here are the steps to create a footer file:
- Create a new file with the name footer.php in a text editor.

Create footer.php file
- Head to folder (C:) > xampp > htdocs > testingtwo (you may have a different WordPress folder name) > wp-content > themes > WordPress-theme-from-scratch.

Create footer.php file
- If you have already done it, click Create File.
- Finally, please copy-paste the code below into the footer.php file that you have created. Then Save.
<?php
/**
* The template for displaying the footer
*
* @package Tutorial
*/
?>
<footer class="footer text-center py-2 theme-bg-dark"> <?php bloginfo( 'name' ); ?> </footer>
</div><!--//main-wrapper-->
<?php wp_footer(); ?>
</body>
</html>
For a more detailed explanation on how to use footers, you can check here.
Conclusion and Results
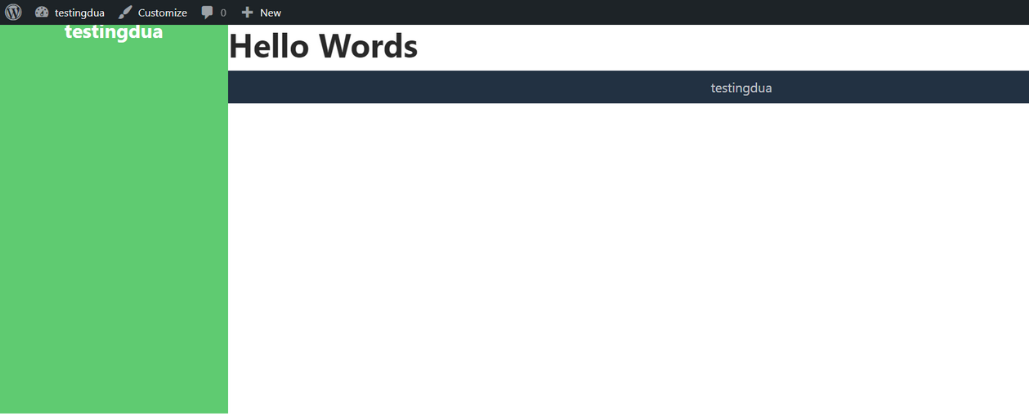
When you’ve finished creating the functions.php file, header.php file, and footer.php file, next you can try logging into your WordPress. Then look at the front-end view. The result will look like this:

WordPress simple theme
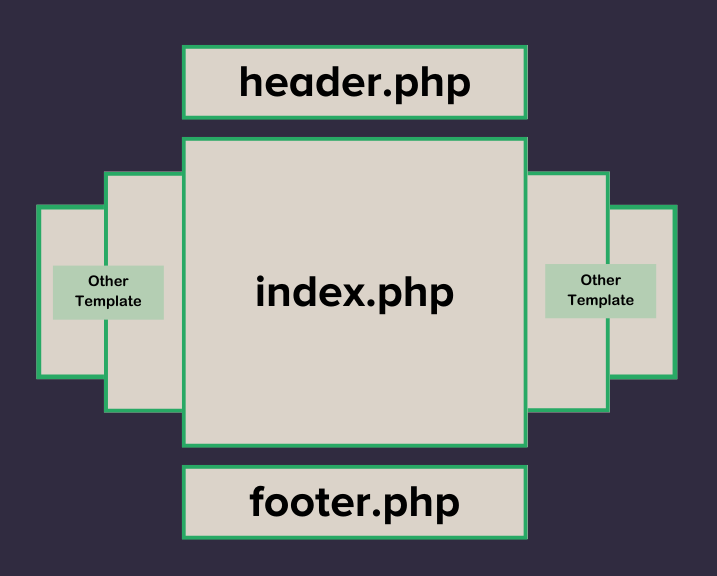
In this step we separate the template into 2 parts, which are (1) a static template, namely the footer and header, and (2) a dynamic template, namely the index.php file created in tutorial part 1. The index.php file is the default template if other template files have not been created.

WordPress theme structure.
The css and js files we listed in function.php are called on the front page via
wp_header()
and
wp_footer()
.
You will then need to create a loop on the
index.php
page, which is a way of displaying articles repeatedly. To do so, follow the next tutorial, how to create your own WordPress theme from scratch part 3.
Creating a website on your own is quite challenging. If you want to focus on your business, you can leave the website development to Tonjoo Team, a professional website developer that has been trusted by many people.
We have handled corporate and start-up websites, such as Polygon, Hipwee, Telkom, and Astra International. Let’s discuss the description of your desired website through Contact Tonjoo and we will help make it happen!
Updated on October 31, 2023 by Admin Tonjoo


