Want to create your own online store website? Follow this guide on how to install WooCommerce on WordPress to easily create your own online store.
Even if you already have an online store on e-commerce platforms like Tokopedia, Bukalapak, Shopee, and so forth, having an online store website comes with many advantages.
So, how do you install WooCommerce on WordPress to make your online store come to life? What are the benefits of having your own online store?
Find out in the explanation below!
What is WooCommerce?
WooCommerce is a WordPress plugin that is specifically used to develop and manage online stores or e-commerce. This plugin supports various features needed in an online store.
The features available on WooCommerce are quite complete, ranging from product management, shopping carts, online payments and so on. This WooCommerce plugin is free and can be directly downloaded through the Plugins tab on WordPress.
To maximize your online store, you can also install the Plugin Ongkos Kirim after successfully installing WooCommerce. Thus, your online store can be integrated to calculate shipping costs through various expeditions.
Check out this tutorial on how to install WooCommerce.
How to Install WooCommerce on WordPress
Installing the WooCommerce plugin in WordPress doesn’t require you to download the plugin first. You can directly search for it through the Plugins page in WordPress.
If you are already logged into WordPress as an admin, follow these steps:
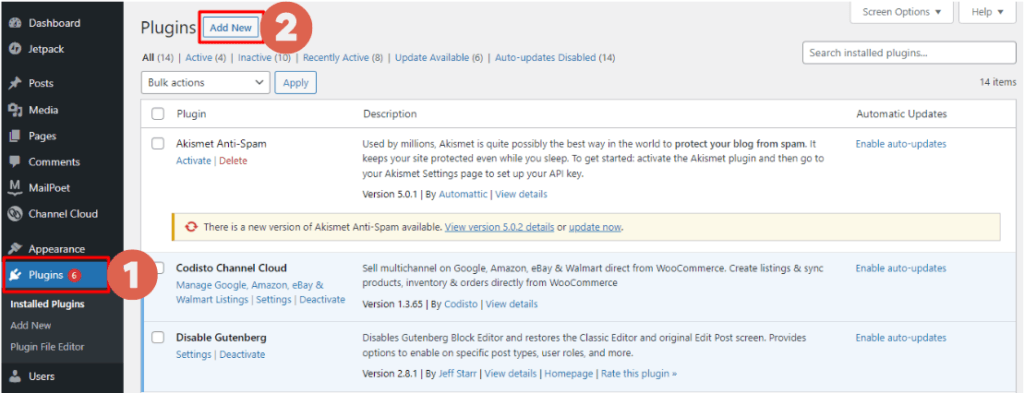
- On your WordPress page, click the Plugins menu > click Add New.

- In the search field, type WooCommerce > then, if the WooCommerce plugin appears, click Install Now. Make sure the plugin you install belongs to Automattic, the developer of WooCommerce.

- Wait for a while. Then the installation button changes to Activate. Click the button and allow the activation process to proceed.

- That’s it, you’ve successfully installed the WooCommerce plugin in WordPress. On the left hand vertical menu, the WooCommerce menu appears.

Installing WooCommerce can be done on localhost as well. So for those who have not rented hosting, you can immediately run an experiment on localhost.
How to Configure the WooCommerce Plugin
When you have finished installing WooCommerce, you will be asked to run the Setup Wizard. When the Setup Wizard request page appears, follow these steps:
- On the Welcome page, click on Let’s Go!

- Click Continue on the Store Locale Setup page. Make sure you enter the store information correctly, starting from a.) store location; b.) currency; c.) product weight unit used; and d.) product dimension unit used. You can always modify this information later.

- On the Shipping & Tax Setup page, check whether you ship products directly and whether you pay sales tax, then click Continue.

- On the Payments page, select the type of payment you prefer to provide, then click Continue.

- Done, you have successfully done the WooCommerce Plugin Setup Wizard. Next, you can click Create your first product to create your first product post. However, if you want to add the product next time, please click Return to the WordPress Dashboard.

That’s all the WooCommerce installation tutorial on WordPress that can help you build an online store easily. To maximize your online store website, you need to configure it as well.
To configure WooCommerce on WordPress, you can read an article on how to properly configure the WooCommerce plugin.
However, building an e-commerce website can be a challenge on its own. If you want to avoid the complexities, you can focus on your business and entrust the management of your website to the professional team at Tonjoo.
Let’s build your e-commerce website easily together with Tonjoo! We have experience in handling various corporate websites and startups.
Contact us now through Contact Tonjoo to discuss the vision and goals of your website, and let us turn them into reality!
Updated on May 15, 2023 by Moch. Nasikhun Amin


