We have learned how to create a single page in WordPress to display article details in the previous post. In step 5 of developing our own WordPress theme, we will learn how to create custom Menu and Widget features.
The Menu feature functions as site navigation, allowing users to navigate through the content within the website. It helps structure and organize the content, while also playing a role in improving SEO (Search Engine Optimization) quality.
The Widget feature in WordPress accommodates users to display commonly placed content in the sidebar or footer, such as latest news, search forms, social media integration, and more.
However, the menu and widget features do not automatically appear when you create your own WordPress theme. You need to add specific functions within the WordPress code. Here is the complete tutorial!
Table of Contents
How to Create Custom Menu Feature for WordPress Theme
To add the menu feature in WordPress, you need to follow these steps: (1) enable the menu in WP Admin, (2) display the menu in the header, (3) add classes to the menu list, and finally, (4) add classes to the anchor.
a. Adding Menu Feature in WP Admin
The first step to create a menu feature in WordPress is to display the menu options in WP Admin. Because if you look at WP Admin > Appearance, there are no menu options available.
The correct way to display the menu feature in WP Admin or the back-end is by adding a function to the after_setup_theme hook. Here is the menu feature function code that you can copy and paste into the functions.php file:
register_nav_menus(
        array(
            'menu-1' => esc_html__( 'Primary', 'tutorial' ),
        )
    );
Please copy the above function into the tutorial_setup(); function. By adding the menu above, it means we have registered a new menu location. This menu location has an ID of menu-1 and is named Primary.
Here is how to add the function code:
- Open functions.php file.

Adding menu feature in WordPress WP-Admin.
- Press the Ctrl + F button, type tutorial_setup to find the
tutorial_setup();function. - Copy the provided code above and paste it into the
tutorial_setup();function.
Function code to add menu feature in WordPress WP Admin.
- Save the code by pressing Ctrl + S button on your keyboard.
After saving it, please check whether the menu feature and the Primary location have appeared in your WordPress WP Admin (back-end). To do this, follow these steps:
- Open your WordPress WP Admin.
- Click on the Appearance menu on the left sidebar. If the Menus option appears, it means it has been successful.

Menu option in WordPress WP Admin.
- You can add menu items by clicking on Pages > Add New. Then create the menu according to your needs.
- Once you have created the menu, go to Appearance > Menus > and the menu list will appear there. Then check the Primary box and click Save Menu.

Primary checkbox in the WordPress menu.
However, the menu you created earlier may not appear on the front-end of your WordPress theme. You need to display it manually.
b. Displaying the Menu in the Header (Front-end)
So far, we have stored the menu that we created earlier in the back-end or WP Admin page. To display it on the front-end or the actual website, we need to add the wp_nav_menu(); function.
Here is the function code to call the menu and display it in the header of your WordPress website:
<?php
wp_nav_menu(
    array(
        'theme_location' => 'menu-1',
        'container'      => false,
        'menu_class'     => 'navbar-nav flex-column text-start',
    )
);
?>
The function above explains that we are calling the menu with the ID of menu-1 and adding the classes navbar-na flex-column text-start to the ul tag. Here are the steps to apply the function above to the header.php file:
- Open the header.php file.

Displaying menu feature in WordPress header.
- Go to the
ul classtag. - Replace the code with the provided function code above, as follows.

Replace the ul code with the new one.
- Adjust the class code to make it more organized.

Organizing the code.
- Save the code by pressing Ctrl + S button on your keyboard.
To see the result, open your WordPress front-end. If it appears successfully, it should look like the image below:

The result of the menu in the front-end.
However, the displayed menu may not be clear yet. To overcome this, we need to learn a bit about filters in the wp_nav_menu() function, similar to how we learned about the filter the_content() earlier.
We will add a filter to modify the output of the called menu. The filter we will learn is nav_menu_css_class. This filter functions to add classes to the ul tag.
c. Adding Classes to the Menu List
When calling the menu in the header, you have the option to add classes to the ul tag, which represents an unordered list or a list with bullet points.
Additionally, you can also add classes to the li tag within the menu. To do this, you need to insert the following function into the functions.php file.
/**
 * Add classes to menu item list
 *
 * @param  array $classes Classes.
 * @param  obj   $item    Menu item object.
 * @param  obj   $args    Menu arguments.
 * @return array
 */
function tutorial_menu_item_list_class( $classes, $item, $args ) {
    if ( 'menu-1' === $args->theme_location ) {
        $classes[] = 'nav-item';
    }
    return $classes;
}
add_filter( 'nav_menu_css_class', 'tutorial_menu_item_list_class', 10, 3 );
In the code above, we added a function that adds the class nav-item to each item in our menu. This function only applies if the menu location we use is menu-1. Therefore, the nav-item class will not be applied to other menus.
Here’s how to add the function to the functions.php file:
- Open the
functions.phpfile. - Copy the provided function code. Paste it at the very bottom of the
functions.phpfile.
Adding list to the menu.
- Save the code by pressing Ctrl + S button on your keyboard.
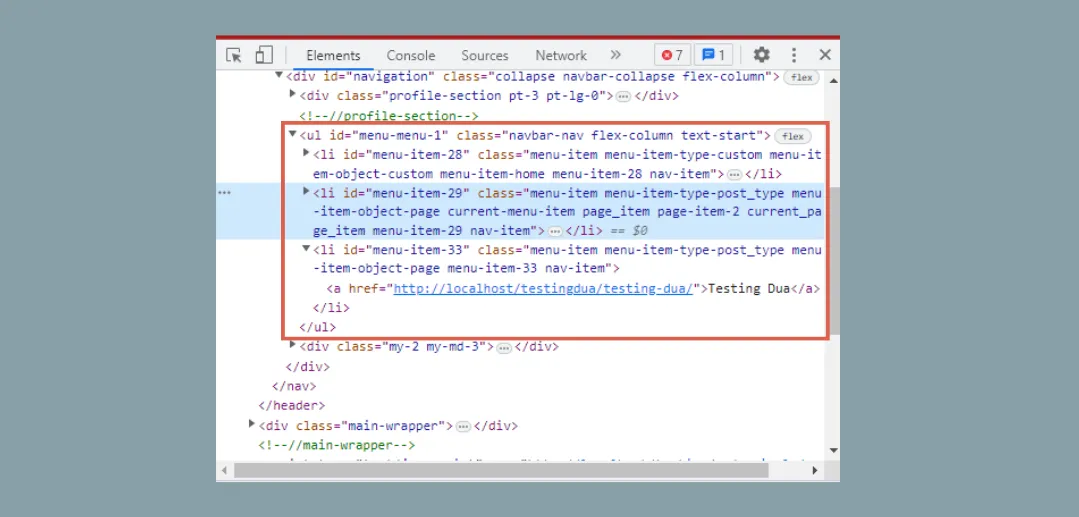
To verify the success, you can examine the front-end by right-clicking and choosing Inspect. Navigate to the ul tag and confirm the presence of the nav-item class in the li tags. If it is present, it indicates successful implementation.

Checking whether the adding list is successfull.
d. Adding Classes to the Anchor
In the context of web and HTML, an anchor refers to the <a> tag. The anchor tag, or a, is used to create hyperlinks, which allow users to navigate from one section of a web page to another, or to a different web page altogether.
Now, here we will use a WordPress function called nav_menu_link_attributes. This function is used to add additional classes or attributes to the a tag.
/**
 * Add classes to menu item link
 *
 * @param  array $atts HTML attributes.
 * @param  obj   $item Menu item object.
 * @param  obj   $args Menu arguments.
 * @return array
 */
function tutorial_menu_item_link_class( $atts, $item, $args ) {
    if ( 'menu-1' === $args->theme_location ) {
        $atts['class'] = 'nav-link';
        if ( in_array( 'current-menu-item', $item->classes ) ) {
            $atts['class'] .= ' active';
        }
    }
    return $atts;
}
add_filter( 'nav_menu_link_attributes', 'tutorial_menu_item_link_class', 10, 3 );
In the above code, similar to the previous function, there is a condition for menu-1 to ensure that the class is not added to other menus. Additionally, there is a built-in WordPress class called current-menu-item.
This class appears when a link in the menu is visited. So, the above condition serves to add the active class if the menu is visited. Please add the two functions above to the functions.php file. Here’s how to add them:
- Open the functions.php.
- Copy the above functions and paste them at the bottom of the functions.php file.

How to add class in the anchor.
- Save the functions (Ctrl + S). Then, check your WordPress front-end. The appearance will be as follows:

The final result on the front-end.
How to Add Widget Area Feature
The main function of widgets is to personalize content, facilitate navigation, insert dynamic content, integrate with social media, and even for marketing purposes.
To create a widget, we need to register it first using the register_widget() function. Here are the detailed code instructions:
/**
 * Register widget area.
 */
function tutorial_widgets_init() {
    register_sidebar(
        array(
            'name'          => esc_html__( 'Sidebar', 'tutorial' ),
            'id'            => 'sidebar-1',
            'description'   => esc_html__( 'Add widgets here.', 'tutorial' ),
            'before_widget' => '<section id="%1$s" class="widget %2$s">',
            'after_widget'  => '</section>',
            'before_title'  => '<h2 class="widget-title">',
            'after_title'   => '</h2>',
        )
    );

    register_widget( 'Tutorial\Profile_Widget' );
}
add_action( 'widgets_init', 'tutorial_widgets_init' );
In the above code, we register the widget with the attributes added to the array. Here are the detailed attributes and their explanations:
namefunctions to give a name to the widget.idfunctions to initialize the widget’s ID. This ID serves as a parameter when the widget is called.descriptionfunctions to add a description to the widget.before_widget, after_widgetserve as wrappers when the widget is called on the front-end.before_title, after_titleserve as wrappers for the widget’s title when it is called on the front-end.
Please add the above function to the functions.php file to enable the widget menu and register the widget sidebar. Here is how to add the Widget Area feature function to the functions.php file:
- Open the functions.php file > go to the bottom.
- Copy and paste the Widget function code at the bottom of the functions.php file.

Creating widget in WordPress.
- Save the inserted function (Ctrl + S).
- Next, view the Widget feature in WP Admin by clicking on the Appearance > Widgets menu.

Widget menu has appeared on the WordPress WP-Admin.
Next, fill the widget sidebar with any content. Here, we take the example of using a heading widget and calling it in the header. To call it, we just need to add the following function to the header.php file.
<?php dynamic_sidebar( 'sidebar-1' ); ?>
Here is the code of the header.php file after we added the menu and widget functions.
<?php
/**
 * The header for our theme
 *
 * @package Tutorial
 */

?>
<!doctype html>
<html <?php language_attributes(); ?>>
<head>
    <meta charset="<?php bloginfo( 'charset' ); ?>">
    <meta name="viewport" content="width=device-width, initial-scale=1">
    <link rel="profile" href="https://gmpg.org/xfn/11">

    <?php wp_head(); ?>
</head>

<body <?php body_class(); ?>>
<?php wp_body_open(); ?>

    <header class="header text-center">
        <h1 class="blog-name pt-lg-4 mb-0"><a class="no-text-decoration" href="<?php echo esc_url( home_url( '/' ) ); ?>"><?php bloginfo( 'name' ); ?></a></h1>

        <nav class="navbar navbar-expand-lg navbar-dark" >

            <button class="navbar-toggler" type="button" data-bs-toggle="collapse" data-bs-target="#navigation" aria-controls="navigation" aria-expanded="false" aria-label="Toggle navigation">
                <span class="navbar-toggler-icon"></span>
            </button>

            <div id="navigation" class="collapse navbar-collapse flex-column" >

                <?php dynamic_sidebar( 'sidebar-1' ); ?>

                <?php
                wp_nav_menu(
                    array(
                        'theme_location' => 'menu-1',
                        'container'      => false,
                        'menu_class'     => 'navbar-nav flex-column text-start',
                    )
                );
                ?>

                <?php
                $options = get_option( 'tutorial_options' );
                ?>
                <?php if ( ! empty( $options['contact_title'] ) && ! empty( $options['contact_url'] ) ) : ?>
                    <div class="my-2 my-md-3">
                        <a class="btn btn-primary" href="<?php echo esc_url( $options['contact_url'] ); ?>" target="_blank"><?php echo esc_html( $options['contact_title'] ); ?></a>
                    </div>
                <?php endif; ?>

            </div>
        </nav>
    </header>

    <div class="main-wrapper">
Conclusion and Results
In this fifth step of creating our own WordPress theme, we have successfully added the menu and widget features. These features are crucial for building website navigation structure and adding interactive elements.
In conclusion, before registering menus and widgets in WordPress, these features remain hidden and, of course, cannot be used. Registering menus and widgets only opens access to these features in the admin panel.
However, to display these features on the homepage, we need to add functions to call these features and include them in the desired display file.
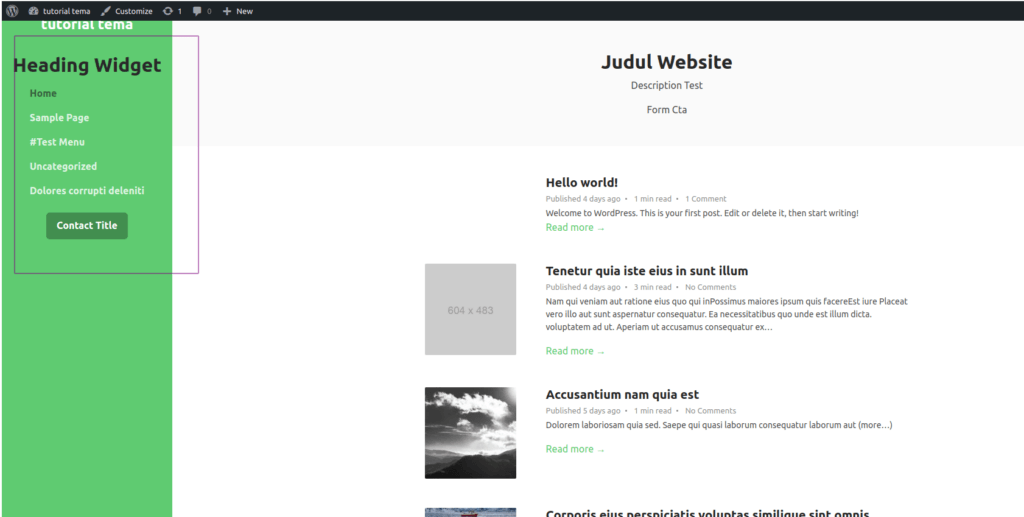
The following image shows the results of calling menus and widgets on the homepage.

Final result on the frontend.
The final step in developing this custom WordPress theme is to create pagination and theme options, which include the feature for page navigation on the website and creating various theme display options.
Building a website on your own can be a challenge. If you prefer to focus more on your business, Tonjoo Team can assist you. We are professional website developers who have gained trust from various parties.
From large corporate websites to start-ups, we have handled them, including Polygon, Hipwee, Telkom, and Astra International. Let’s discuss your dream website idea through Contact Tonjoo, and we will help bring it to life!
Updated on October 31, 2023 by Admin Tonjoo


