We have learned how to design menus and widgets in the series to create a custom WordPress theme. Now, we move on to the final step, which is creating pagination and theme options in WordPress.
Pagination feature is designed to enhance user experience. By default, WordPress displays ten articles per page, which can be inconvenient for users. Therefore, pagination allows users to navigate through multiple pages of content.
On the other hand, theme options provide a way to customize the theme without touching the code. It allows users to adjust various aspects such as colors, fonts, layouts, and more.
So, how do we create pagination and theme options in WordPress? Here’s a complete tutorial to guide you through the process!
Table of Contents
How to Create Pagination in WordPress
Pagination plays an important role in facilitating users to browse and navigate through extensive or lengthy content that cannot be displayed on a single web page.
With pagination, users can access and read content gradually without any interruption or delays in page loading.
To display navigation buttons (prev/next) on the home page, archive, and search results, you can use the following custom function.
/**
* Display posts navigation
*/
function tutorial_posts_navigation() {
global $paged, $wp_query;
if ( $wp_query->max_num_pages > 1 ) {
if ( ! $paged ) {
$paged = 1;
}
$nextpage = (int) $paged + 1;
$max_page = $wp_query->max_num_pages;
$prev_link = previous_posts( false );
$next_link = next_posts( $max_page, false );
echo '<nav class="blog-nav nav nav-justified my-5">';
if ( $paged > 1 ) {
echo '<a class="nav-link-prev nav-item nav-link rounded" href="' . esc_attr( $prev_link ) . '">' . esc_html__( 'Previous', 'tutorial' ) . '<i class="arrow-prev fas fa-long-arrow-alt-left"></i></a> ';
}
if ( $nextpage <= $max_page ) {
echo '<a class="nav-link-next nav-item nav-link rounded" href="' . esc_attr( $next_link ) . '">' . esc_html__( 'Next', 'tutorial' ) . '<i class="arrow-next fas fa-long-arrow-alt-right"></i></a>';
}
echo '</nav>';
}
}
In the above function, there are variables and functions that we need to highlight:
global $paged;This variable is a built-in global variable in WordPress. It stores the current page number. When there is no page/paged parameter in the URL, it means we are on page 0.global $wp_query;This variable stores the query executed when we are on a specific page.previous_posts();This function is used to call the URL of the previous page.next_posts();This function is used to call the URL of the next page. In the code above, there are 3 conditions:
-
if ( $wp_query->max_num_pages > 1 )This condition checks if the current page has a next page or not.if ( $paged > 1 )This condition checks if the page is greater than 1, then the previous link will appear.if ( $nextpage <= $max_page )This condition checks if the page is not the last page, then the next link will appear.
To use the function mentioned above, follow these steps:
- Open the
functions.phpfile.
Open functions.php file and put the pagination function code.
- Copy the provided function code and paste it at the bottom of the
functions.phpfile. - Open the
index.phpfile. - Insert the function call code* below the
endwhile;line, as shown below:
Calling function via index.php file.
*Here is the function call code that you can copy:
<?php tutorial_posts_navigation(); ?>
To see if the pagination has been successfully implemented, please go directly to the front-end and look at the bottom of the article. This is how the pagination buttons will appear:

The final result of pagination on WordPress.
How to Create Theme Options in WordPress
Theme Options is an admin page that contains fields for configuring a website without touching any files or code. Theme options can be created using plugins like Advanced Custom Field Pro or manually.
For the manual approach, you can refer to the source code in the /inc/class-options.php directory. Since the code is too long, we won’t include it in this article.
Here are the steps to implement the code for creating Theme Options:
- Open the WordPress-theme-from-scratch folder and select the inc folder.

Open the inc folder.
- Create a file named class-options.php in that folder.

Create class-options.php file.
- Copy the code from the directory /inc/class-options.php, then paste it into the file class-options.php.

Paste the code into the class-option.php file.
- Copy the code
include TUTORIAL_DIR . '/inc/class-options.php';to call the previously created file. - Paste the calling code into the functions.php file below the code class-profile-widget.php.

Use the calling code.
The above code snippet is used to display menus and option fields that will be shown on the front-end. To display them, you need to insert the following code into the index.php file.
<?php $options = get_option( 'tutorial_options' ); ?>
    <?php if ( ! empty( $options['cta_title'] ) ) : ?>
        <section class="cta-section theme-bg-light py-5">
            <div class="container text-center single-col-max-width">
                <h2 class="heading"><?php echo esc_html( $options['cta_title'] ); ?></h2>

                <?php if ( ! empty( $options['cta_description'] ) ) : ?>
                    <div class="intro"><?php echo wp_kses_post( $options['cta_description'] ); ?></div>
                <?php endif; ?>

                <?php if ( ! empty( $options['cta_form'] ) ) : ?>
                    <div class="single-form-max-width pt-3 mx-auto">
                        <?php echo do_shortcode( $options['cta_form'] ); ?>
                    </div><!--//single-form-max-width-->
                <?php endif; ?>

            </div><!--//container-->
        </section>
    <?php endif; ?>
Here’s how to put the above code into the index.php file:
- Open index.php file.

The place of the code.
- Copy the above code and paste it below the code
<index?php endif; ?>.
The place of the code.
- Save the changing code by pressing Ctrl + S button on your keyboard.
Isn’t there quite a lot of code being implemented? We don’t need to learn all of it, as most of the functions are just repetitive. Therefore, let’s break down only the important functions for us to learn.
a. Hook
Hooks in WordPress are features that allow developers to add additional code or modify existing code. This eliminates the need to modify the core code of WordPress themes or plugins directly.
admin_initserves as a hook that is triggered on admin pages.admin_menuserves as a hook that is triggered in the admin menu.
b. Functions
register_setting();functions to register options and their data.add_settings_section();functions to register sections for each field.do_settings_sections();calls the sections that we have registered.settings_fields();calls the setting group that we registered earlier.sanitize_text_field();functions to filter the input string to secure it from XSS injection attacks.wp_kses_post();similar to sanitize_text_field but more suitable for longer strings, usually used for text area fields.
Conclusion and Results
This final step involves implementing pagination on the index page, which is very easy. The implementation does not require manual SQL queries, but simply calls the functions available in WordPress.
Similarly, the implementation of the options page is also very straightforward, as it only involves calling WordPress functions and does not involve manual database insert queries.
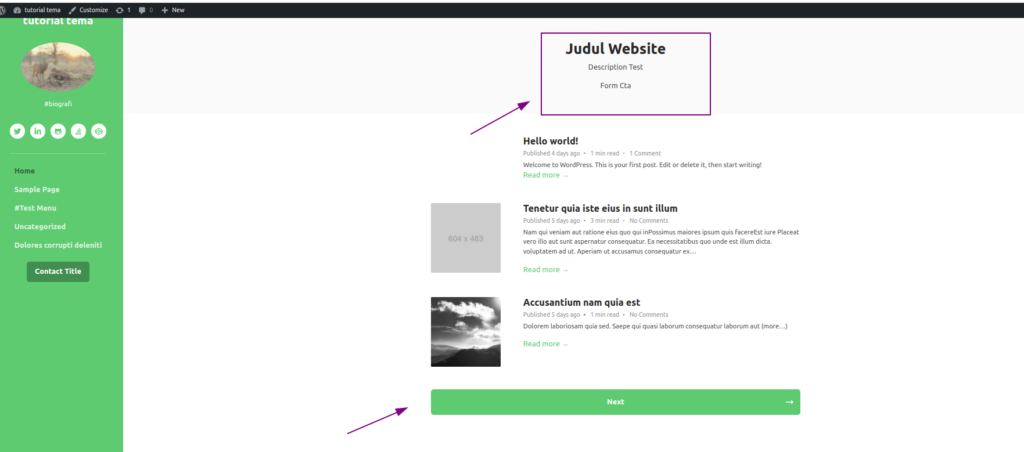
Here is the result of the Theme options page that you have created:

Theme options in WP Admin WordPress.
We don’t need to add excessive CSS or lengthy HTML tags. Next, here is the result of the implemented front-end page.

The final result in the front-end.
That concludes the final step of creating a WordPress theme, which is implementing pagination and theme options. Hopefully, this tutorial has provided benefits and helped readers develop their skills in creating WordPress themes.
By following this tutorial, it is expected that readers can create WordPress themes according to their needs and stay updated with the latest developments in the WordPress world.
Feel free to explore and experiment with the WordPress theme that has been created. Remember to always prioritize security and privacy in WordPress themes and follow best practices in theme development.
If you still have concerns about the security of creating your own WordPress theme, you can entrust the development to Tonjoo Team, a software development company with experience in creating websites for government and corporate entities.
Want to create a sophisticated website like Astra Isuzu, Futureskills, Mualaf Center Yogyakarta, or Rey? Let’s discuss your website needs, from its features, design, to its system, through contacting Tonjoo.
Updated on June 12, 2023 by Moch. Nasikhun Amin


