After successfully installing WooCommerce on WordPress to create an online store website, it is important to set up WooCommerce shipping option.
Since one of the crucial elements in online buying and selling is the shipping process, WooCommerce provides features to manage shipping requirements.
The two most important features are 1.) setting up shipping zones, and 2.) configuring shipping methods. This means you need to manually set up the shipping costs using these features.
Although there is an easier way, which is by using a third party plugin such as Plugin Ongkos Kirim, it’s worth trying the manual shipping setup in WooCommerce first.
Table of Contents
How to Set Up WooCommerce Shipping
Before starting the process of adding a shipping method in WooCommerce, make sure you are logged in as an Admin on WordPress. If you are, please proceed with the following steps:
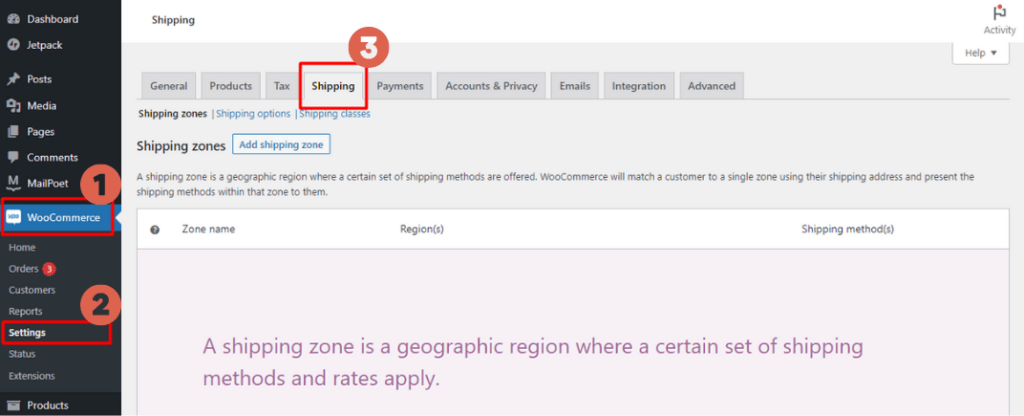
- Click the WooCommerce menu > select Settings > klik Shipping tab.
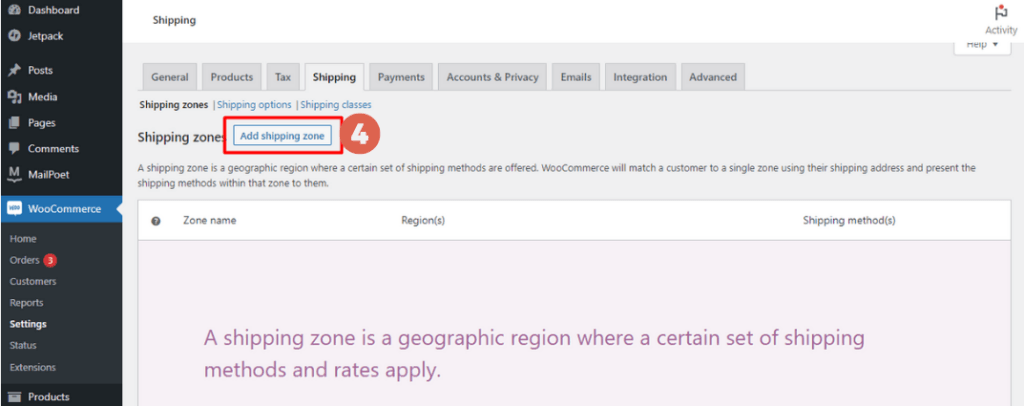
- Next, click Add shipping zone to add the region, rate, and shipping service you are using.
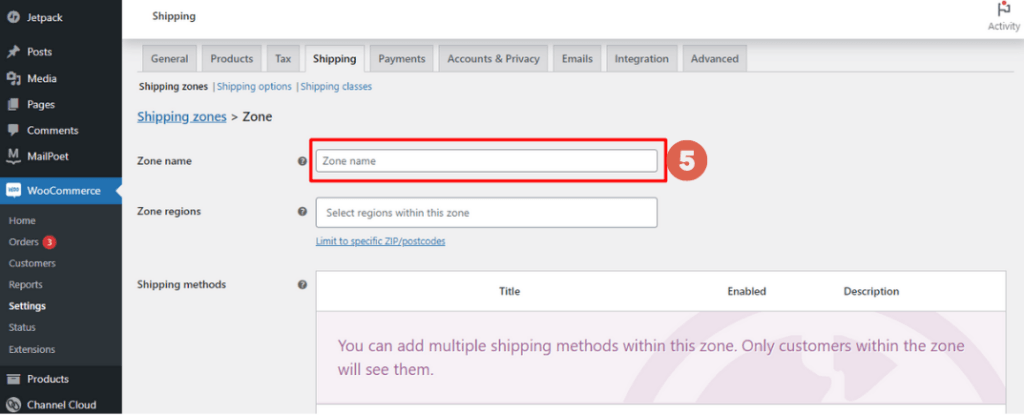
- In the Zone name field, you can name the shipping Zone as you wish. For example, Zone 1, North Zone, or other names as needed.
- In the Zone regions field, select which provincial regions you want to enter. For example, East Java, West Java, Central Java, and so forth.
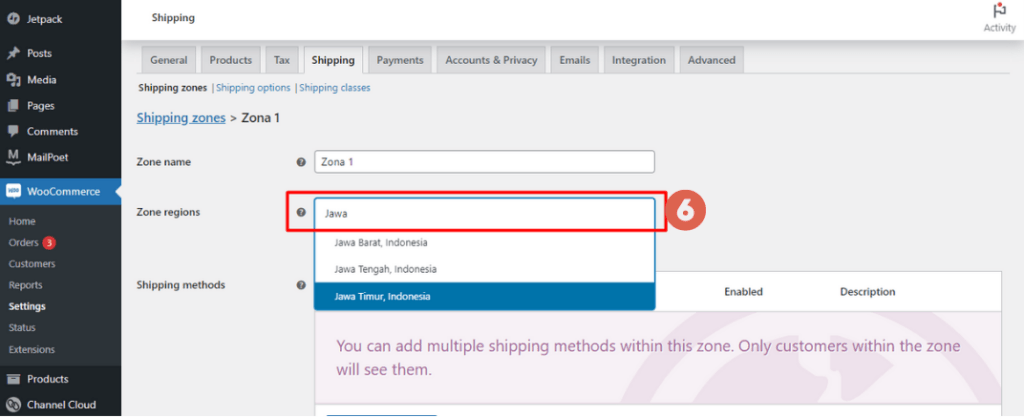
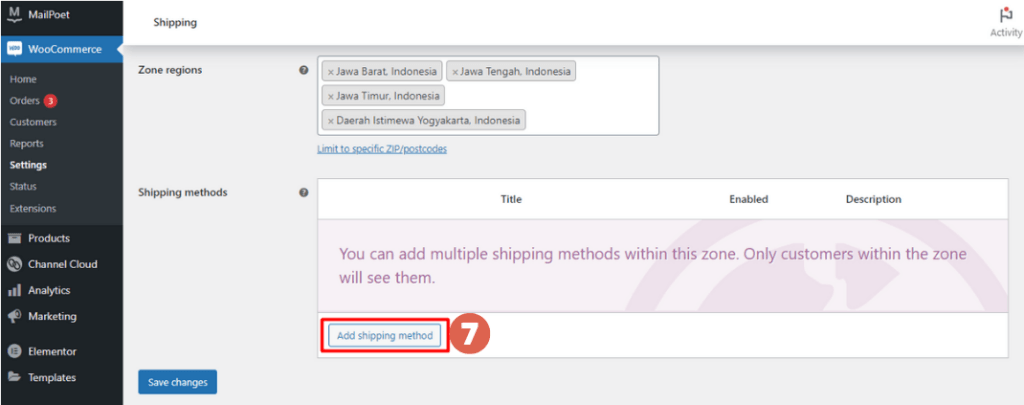
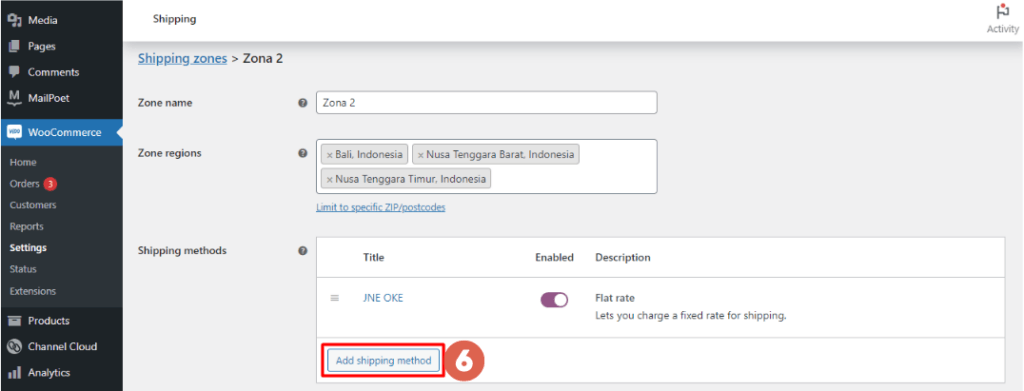
The drawback of WooCommerce’s built-in Shipping Zone feature is that there is no choice of regions up to the sub-district level. So only up to the provincial level. In order to be able to get regions up to the sub-district level, you can use third party plugin such as Plugin Ongkos Kirim. - Afterward, click Add shipping method to add a shipping method.
- Select one of the methods, either: a.) Flat rate, b.) Free shipping, or c.) Local pickup > then click Add shipping method.
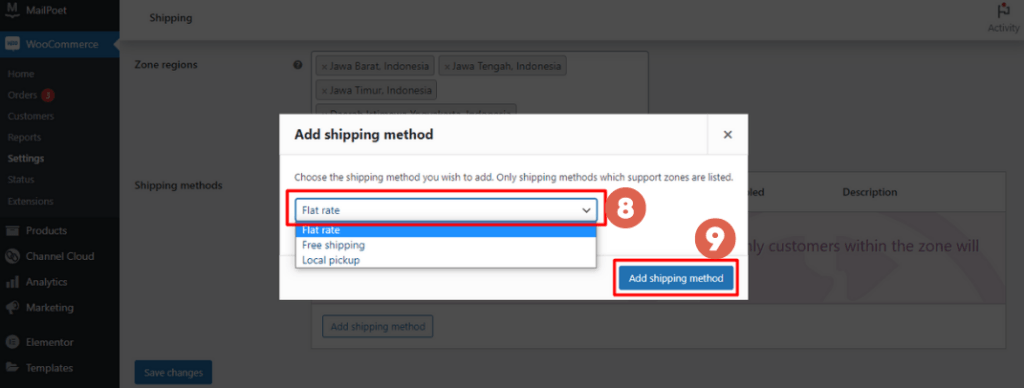 For example, in Zone 1 with the majority of provinces in Java, maybe you only provide Flat rate and Local pickup delivery services, then just choose these two methods.
 - You can follow the details of each Shipping Method setting below. You don’t have to make all the shipping method selections. Just choose the ones that you really need.
a. Flat Rate Settings
You can choose a flat rate if you want to add shipping services with normal shipping costs. Here are the steps to set up a flat rate:
- If you have created a Flate rate Shipping method, navigate to the Flat rate link > click Edit.
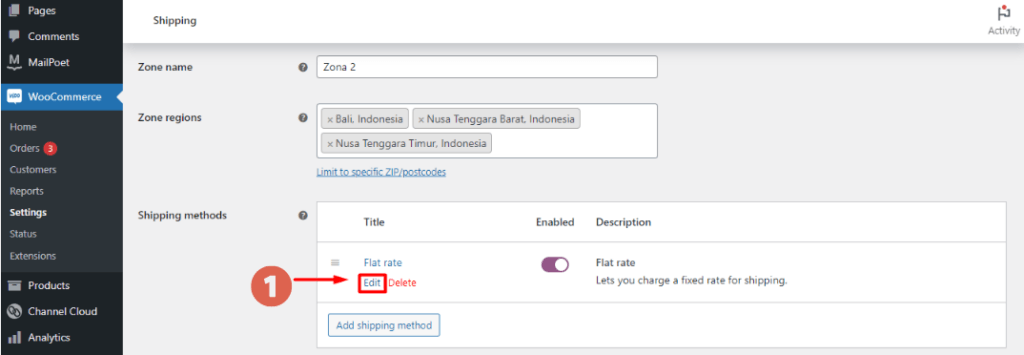
- After the Flat rate Settings pop up appears, set the a.) Method title, b.) Tax status, and c.) Cost.
 a.) In the Method title field, you can write the name of the shipping courier and the type of service. For example, JNE OKE.
b.) In the Tax status field, you can choose between Taxable or None.
c.) In the Cost field, please enter the shipping rate. For example, 20,000 (No need to add a period or comma). - Afterwards, click Save changes to save.

- If you want to add a shipping service with a different rate, please add it by clicking Add shipping method.
Note:
Before you enter the shipping rates for a particular region for a particular courier, you should check the shipping rates carefully.
b. Free Shipping Settings
What is meant by Free Shipping in WooCommerce is a feature that can be selected if you provide a package shipping option at no cost.
So, you can choose Free Shipping if you want to add a free shipping option, either with conditions or without conditions. The condition in question, for example, is the existence of a minimum order amount.
- Click Add shipping method > select Free shipping > click Add shipping method.
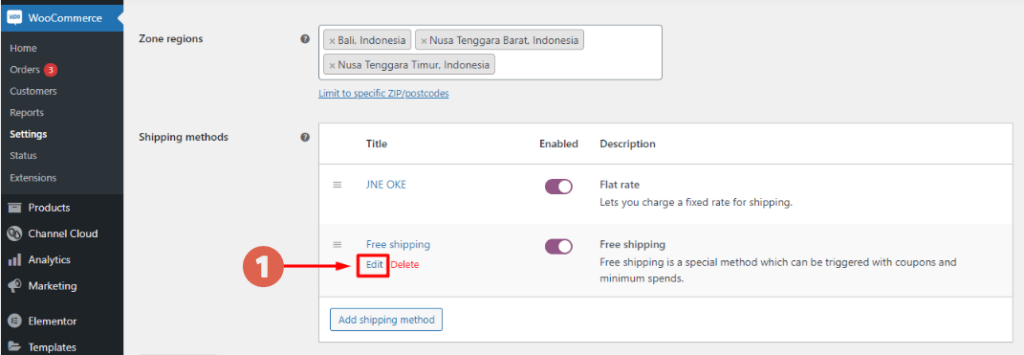
- If you have created a Free shipping method, hover over the Free shipping link > click Edit.
- In the Title field, please give a title as needed. For example, you can write the title Free Shipping.

- In the Free shipping requires… field, select one of the options:

 a.) N/A : means there is no free shipping conditions.
b.) A valid free shipping coupon : means you can get free shipping if you use the coupon.
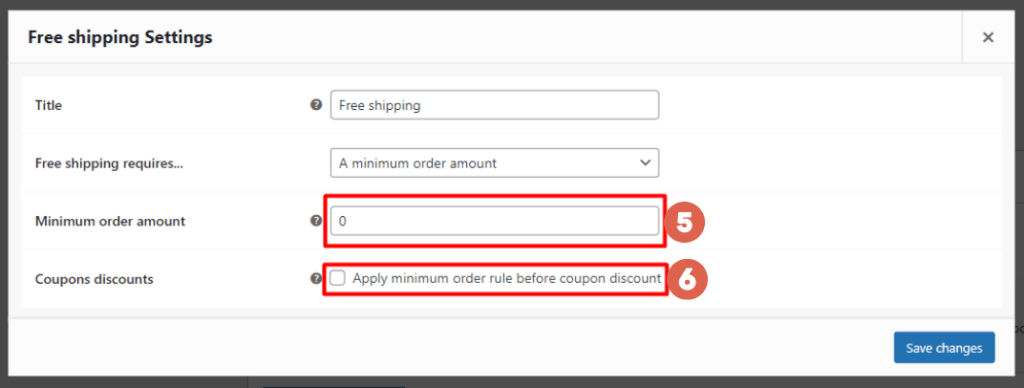
c.) A minimum order amount : means there is a minimum shopping amount to get free shipping.
d.) A minimum order amount OR a coupon: means there is a minimum shopping amount or coupon to get free shipping.
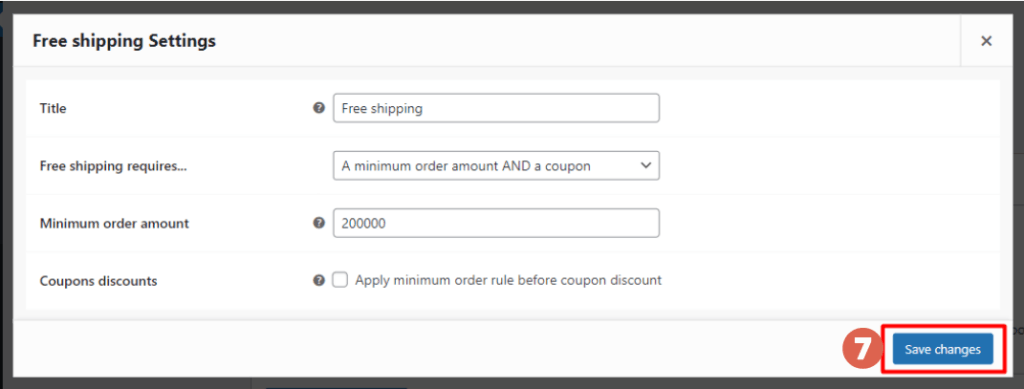
e.) A minimum order amount AND a coupon: means there is a minimum shopping amount and a coupon to get free shipping. - If you choose option a – b, please skip to the next step. If you choose option c – e, fill in the Minimum order amount and check Coupons discounts if required.
- Click Save changes to save the settings and you are done.
c. Local Pickup Settings
Local Pickup is a feature to give an option if the customer wants to pick up the ordered product itself to the office of the delivery service or courier.
Here’s how to set up item delivery in WooCommerce with the Local pickup feature:
- On the Shipping page, click Add shipping method > select Local pickup > click Add shipping method.
- If you have created a Local pickup shipping method, place the cursor on the Local pickup link > click Edit.
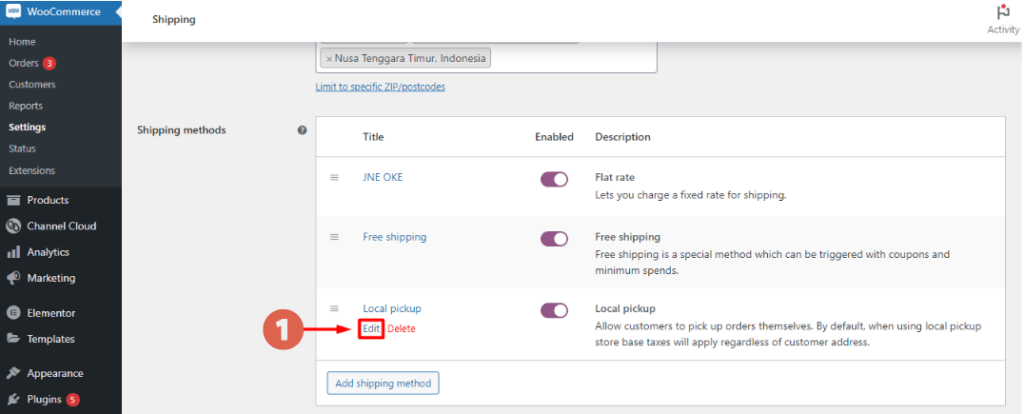
- After the Local pickup settings pop-up appears, set the sections a.) Title, b.) Tax status, and c.) Cost.
 aa.) In the Title field, you can change it as needed. For example, you may fill it with “Pick up at JNE”.
b.) In the Tax status field, select the None or Taxable option.
c.) In the Cost field, enter the nominal shipping cost if the item is picked up at the nearest courier office. - If you did, click Save changes to save the settings.

That’s the tutorial on how to set up WooCommerce shipping. Yes, you really need to add Zone Region or shipping area one by one. In addition, for each area, the details of the rate also need to be set.
So, setting the default shipping method in WooCommerce is a bit troublesome at the beginning. Beyond that, you also need to get accurate shipping data for each region.
If you’re looking to effortlessly create an e-commerce website to sell your products, you can leave the website development to Tonjoo team, an experienced international website developer.
We have extensive experience in developing and managing various types of websites, from e-commerce to media, such as Polygon and Hipwee. Let’s discuss how we can support you by contacting Tonjoo.
Updated on May 17, 2023 by Moch. Nasikhun Amin


