Are you ready to take full control of your website? With self hosted WordPress, you can break free from limitations.
WordPress Self Hosting is a free content management system (CMS) that allows you to easily create a website or blog.
In contrast to a WordPress local host that isn’t connected to the internet, opting for a self-hosted solution will bring your WordPress site online, making it accessible to the wider world.
To get started with WordPress Self Hosting, you will need a domain name and hosting. The domain name is the address of your website (e.g., www.example.com), and the hosting is the space where you store all the data for your WordPress website. You can download WordPress Self-Hosting from http://wordpress.org.
Table of Contents
What is a Self Hosted WordPress
A self hosted WordPress site refers to a website that is built using the WordPress software but is hosted on your own web server or hosting provider of your choice. It involves downloading the WordPress software from WordPress.org and installing it on a web server that you have control over.
In a self hosted WordPress setup, you have full control over your website’s files, content, design, and functionality. You can customize your site to meet your specific needs, install custom themes and plugins, and have complete ownership and control over your website’s data.
The advantages of using WordPress Self Hosting are:
- Can freely install various Plugins available on WordPress.org and others
- It has a wide variety of themes
- Free to Customize the files contained in our wordpress website
- Free server setup tailored to the needs of our Website
As mentioned before, before you can self-host a website, you need a domain name and hosting. You can purchase them via the hosting service.
If you’re looking for reliable hosting providers, check out our list of the top 10 web hosting companies in India.
How to Self Host a WordPress
To simplify the process of self-hosting a WordPress website, we can break it down into three main steps. First is purchasing the domain and web hosting, then Installing the WordPress and Customization.
Step 1: Purchasing Hosting Services and Domain Name
First of all, you have to purchase a hosting service and domain name. It’s essential to make your website online and accessible from the internet.
- Obtain a Domain Name
Choose and register a unique domain name for your website. Many domain registrars offer domain registration services. - Choose a Web Hosting Provider
choose a web hosting provider that meets your requirements. Consider factors like budget, server reliability, speed, customer support, pricing, and available resources. - Set Up Your Hosting Account
Sign up for a hosting account with your chosen provider. Provide necessary information, choose a hosting plan, and make the payment. - Configure the domain’s DNS (Domain Name System)
Update DNS settings to point to your hosting provider’s nameservers. This ensures that when someone enters your domain name in a browser, it directs them to your hosting account.
You can check our list of website hosting charges in India to find suitable hosting services. Hosting in India is known for its affordability, local customer support, and data center options.
Step 2: Install WordPress
Most hosting providers offer one-click WordPress installation through popular hosting control panels like cPanel or Plesk. Alternatively, you can manually install WordPress by downloading the software from the official website (http://wordpress.org).
Here we will show you to install WordPress by using a cPanel.
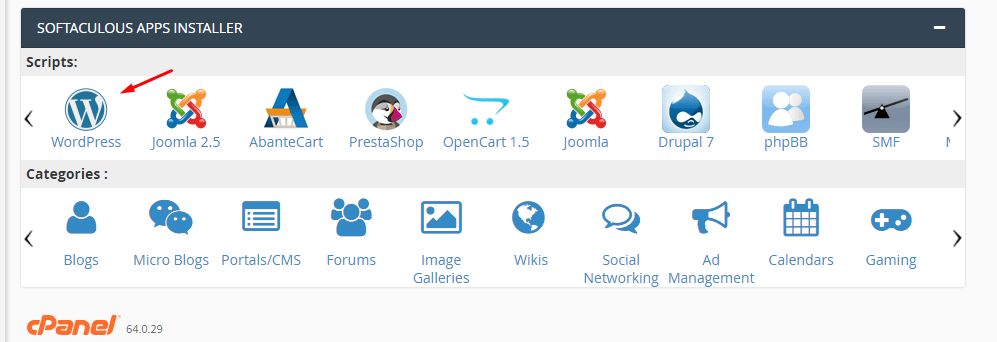
1. Login to cPanel website. Example: http://yourdomain.com/cpanel, after successful login, Select Softaculous > WordPress.
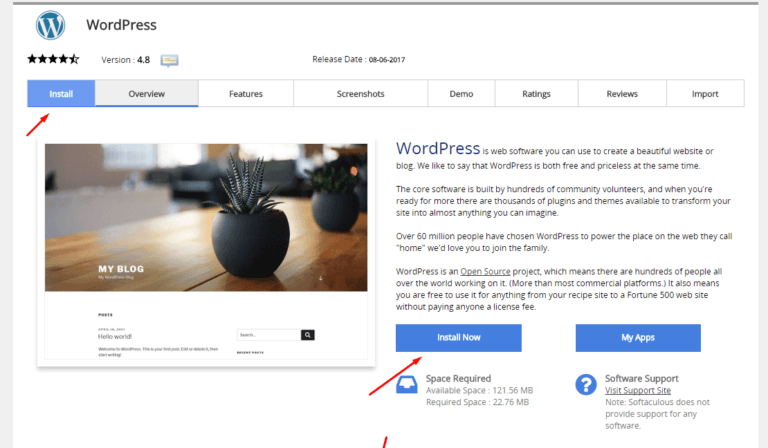
2. While on the WordPress page select Install > Install Now
3. Next fill the required form as below
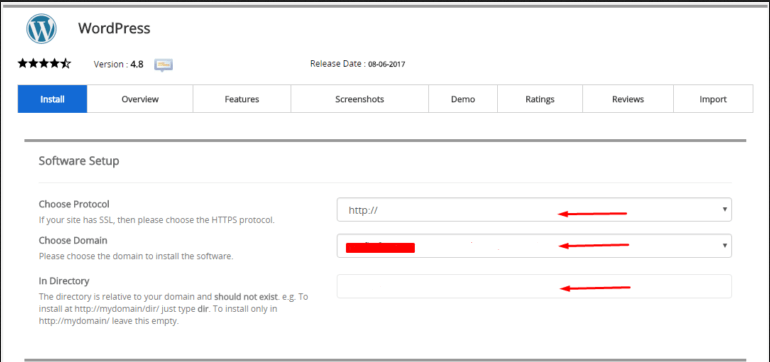


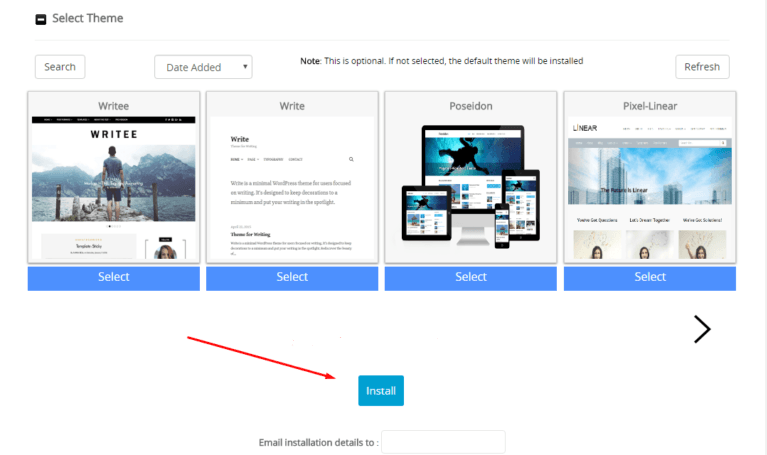
Okay if you have to fill out the WordPress configuration form, then click Install and wait for the installation process of WordPress Self Hosting. Congratulations you have successfully Installed self-hosting WordPress with ease.
Step 3: Customize Your Website
After WordPress is successfully installed on your hosting account, you can move on to the next steps to set up and customize your website. Firstly, log in to your WordPress admin dashboard using the credentials you created during the installation process.
You can do these things and starts to
- select a theme
- add content
- install plugin
Wrap Up
In conclusion, installing a self hosted WordPress site provides you with the freedom and flexibility to create a website that is truly your own. By following the steps outlined in this article, you can confidently embark on your journey of building a professional and customized website.
Remember to choose a reliable web hosting provider, secure your website, and regularly maintain and update your WordPress installation.
If you find this too complicated to follow, you can discuss it with us. Our WordPress hosting consultancy offers expert guidance and personalized recommendations to help you find the perfect hosting provider for your website.
Start to work with Tonjoo and let us elevate your WordPress hosting experience to new heights!
Updated on June 12, 2023 by Hanif Mufid


LEAVE A REPLY