Do you want to develop a website but don’t have any idea where to start? Here you can learn how to create homepage in WordPress using Gutenberg editor.
The homepage is the front or main page of a website. It is the central information and navigation page of website for the users.
In this WordPress tutorial, we also provide articles on learning Gutenberg in a series. The article links for each series are provided in the subheadings below.

Final result of creating homepage using Gutenberg WordPress (Gutenberg website example).
We will cover a comprehensive guide on how to build a website’s Homepage with Gutenberg, which normally covers header, footer, slider, logo, list post, and gallery. Let’s get started!
Table of Contents
A. Understand What Gutenberg WordPress Is
Before getting into Gutenberg WordPress tutorial, you need to understand what Gutenberg is. Gutenberg is the latest version of the WordPress editor which replaces the earlier version, Classic Editor.
The key difference between Gutenberg and the Classic Editor lies in the use of Block feature. Block refers to element of content that serves various purposes; from simple paragraph to text and heading, image, button, and many more.
Blocks can be added, moved, arranged-rearranged, and delated easily. Therefore, it simplifies the process of creating pages and post.
Gutenberg has become the default editor since WordPress version 5.0 and above. The difference between the Classic Editor and Gutenberg is depicted in the image below.

The different UI appearance between Classic Editor (Left) and Gutenberg Editor (Right).
One important Gutenberg plugin that you should learn and utilize in website creation is Gutentor. You can explore more about Gutenberg and Gutentor here.
B. How to Use Block Editor Gutenberg
To create basic homepage, there are three essential parts to keep in mind when using the Gutenberg WordPress editor. This way, you won’t get confused with other WordPress features.
1. Create Header, Footer, and Page
To build the Homepage, there are two main menus in WP Admin that you’ll use: (1) create and edit Header and Footer in the Appearance > Editor menu, and (2) create and edit pages through the Pages menu.

For now, in this Homepage creation tutorial, you can ignore other menus on the WP Admin home page. You might also touch on other sections like Posts, Settings, and Plugins, but the interaction with them is minimal.
2. Add Blocks
When creating a page for the first time, the Gutenberg editor’s main page already contains two types of blocks: the title and the paragraph. If you want to add images or other elements, you need to add blocks.
To add a new block, there are two ways: (1) click [+] on the top toolbar, or (2) click [+] on the editor area as shown in the image below.

3. Adjust Blocks Structure via List View
You can access the List View feature by clicking on number 1. Additionally, you can use the Shift + Alt + O shortcut to show or minimize the List View feature.

This feature is very helpful when you have created many blocks as shown in number 2. It allows you to easily drag and drop the blocks you’ve created, so you don’t have to directly interact with the blocks on the editor page.
4. Edit Blocks via Settings
As you might have already guessed, the Settings feature is used to adjust colors, sizes, and other variations needed for each block. To access it, click the Settings button (number 1).

The appearance and options displayed in the Settings section (number 2) may vary depending on the block. For example, the Paragraph block has text color and size options, while the Row block has Layout settings.
You will frequently use the Settings section when addressing question of how to create homepage in WordPress, especially when making adjustments to the blocks.
C. How to Create Homepage in WordPress using Gutenberg Editor
Once you understand how to use blocks, you are ready to create the Homepage. The components of the Homepage you will be making have the structure shown in the image below:

Main components of Homepage.
Without further ado, let’s dive into the tutorial on how to create Homepage with Gutenberg WordPress!
1. Create Header
To start building your homepage with Gutenberg WordPress, you can begin by creating the header.
The header serves to display the website’s identity and main navigation buttons, such as the logo and navigation buttons for home, about, and other menus. It is located at the top of the website.
Before starting to create the header, you need to install the Gutentor and FakerPress plugins. These plugins may not directly create the header, but they will be useful for the next steps of the tutorial.
To begin creating the header, go to WP Admin > click on Appearance > Editor.

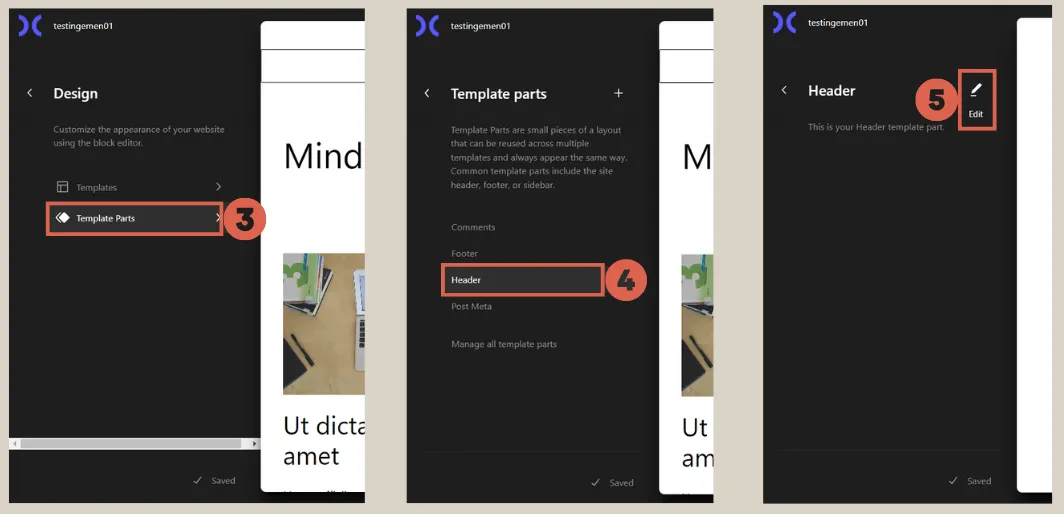
After that, choose Template Parts > select Header > click on the Edit icon.

For more detailed instructions on creating the header, you can read them here.
2. Create Footer
Similar to the header, the footer is also a static part of the website, meaning its appearance and function remain consistent on every page of the website.
In the footer, important information is usually included, such as contact details, company description, copywriting statements, and links to other pages on the website.
To create the footer, follow a similar process as the header: click on Appearance in WP Admin > click on Editor > select Template Parts > choose Footer > click on the Edit icon.
For more detailed instructions on creating the footer, you can read them here. Once you’ve successfully created the footer, also read about how to make header and footer responsive for users accessing the website via mobile.
3. Add Section Slider
The slider is a design element on a website that displays a series of images or other content, which can be manually or automatically slid.
This feature can be a great tool to capture visitors’ attention and give an overview of what is available on the website.
To start creating the slider, click on Pages in WP Admin > click on Add New > click [+] > type carousel in the search box > select the Carousel block.

Next, read more detailed instructions on how to create the Slider section here. To accommodate mobile users, also practice how to make responsive slider.
4. Create Client/Partner Logo Section
The client or partner logo section is a part of the website that displays the logos of brands or companies that collaborate with you. Its purposes include increasing credibility and showcasing experience and connections.
You can create this section right below the Slider section. Use the Image block to insert the logos.
For more detailed instructions on creating the client/partner logo display, you can read them here. To make it mobile-friendly, follow the tutorial on how to create a responsive client logo section.
5. Add List Post Section
The list post section is useful for displaying a list of published posts or articles. These posts can be arranged as the latest, most read, or trending posts.
To add the list post section, add the Query Loop block below the client logo section. For more detailed instructions on creating the list post section, you can read them here.
6. Create Gallery Section
As the name suggests, the Gallery section displays multiple images on the website page. To add this section, you can use the Gallery Widget block, which is a block from Gutentor.
For more detailed instructions on creating the Gallery section, you can read them here. Next, read the tutorial on how to make the list post and gallery sections responsive. If you’ve reached this point, you have successfully practiced how to create homepage in WordPress with Gutenberg.
Conclusion
That’s the tutorial on how to create homepage in WordPress using Gutenberg editor. After successfully creating the homepage, you can also learn how to create WordPress theme from scratch.
However, the homepage creation above is relatively simple and limited in terms of its functionality. For more advanced website functionalities like Hello Health and Hipwee, you can entrust them to the Tonjoo team, experienced web developer for corporate to startup websites.
Let’s discuss your desired website vision through Contact Tonjoo, and we’ll help you bring it to life!
Updated on July 21, 2023 by Moch. Nasikhun Amin


